

Let’s arrange a Minecraft server in just some minutes so that you can get pleasure from with good associates.
Minecraft is a maker’s paradise or a bizarre wanting blocked world that annoys you to the core each time you step inside.
Both manner, players all over the world adore it and play Minecraft in droves, making it the best-selling online game of all time.
When you can play Minecraft solo, the expertise will get boring after hours spent mining and crafting.
Ergo, you will have the multiplayer to maintain the enjoyable alive. Now you’ll be able to be a part of the large title servers and play with a whole lot if not 1000’s of gamers.
Or you’ll be able to create a Minecraft server your self to have enjoyable together with your family members.
You will need to know that this information will create a Minecraft server in your private PC. So that you should not host gamers you do not belief, since you’ll be revealing your IP handle.
And do not forget that we’re hosts Minecraft Java versionthat works on Home windows, macOS and Linux.
Now that sufficient, let’s get all the way down to the true work.
How you can make a Minecraft server
Almost certainly, you’ll use your personal PC for this. Nevertheless, you may as well go for Minecraft Server Internet hosting for further assist {and professional} gameplay for numerous gamers.
However we’ll follow the belief that you just’re utilizing a PC.
And since we’re putting in the Minecraft Java version, we’ll want to put in or replace Java first if you have already got it.
Putting in Java on Home windows is sort of straightforward. Go to this Java obtain web page and obtain the newest model.
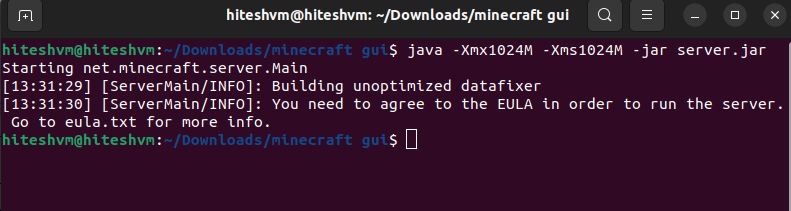
For Ubuntu, open the terminal and enter sudo apt set up openjdk-18-jreand press enter. On the time of writing, Java 18 was the newest; you want to regulate it accordingly.
If you wish to run Minecraft on a third-party cloud server like DigitalOcean, set up Java with this command:
sudo apt set up openjdk-18-jre-headless. Because of this you can be utilizing Minecraft and not using a graphical consumer interface.
Then obtain and set up the Minecraft Java Version Server to get a single file named server. To be clear, there are not any separate recordsdata for Home windows and Linux.
As soon as downloaded, it is very best to create a separate folder for this, because the server will generate extra recordsdata that you’ll be wanting in a pleasant, tidy place slightly than mendacity in the principle obtain folder.
Then you’ll be able to select to have a Minecraft server with or and not using a graphical consumer interface (GUI). Whereas it is useful to have a GUI, for those who select to undergo the command immediate, you’ll be able to have some further sources at your disposal.
Nonetheless, we’ll see them each.
Minecraft server with GUI
Utilizing the Minecraft server with a GUI is nearly an identical in Home windows and Ubuntu.
Home windows
Run the server file.

This doesn’t open something, however creates extra recordsdata, together with a textual content file for the Finish Person License Settlement (eula.txt). Open this textual content file, exchange eula=false of eula=trueand save the modifications.

This means that you just conform to the developer’s phrases and circumstances. When you miss this step, the server will shut down as quickly as you open it.
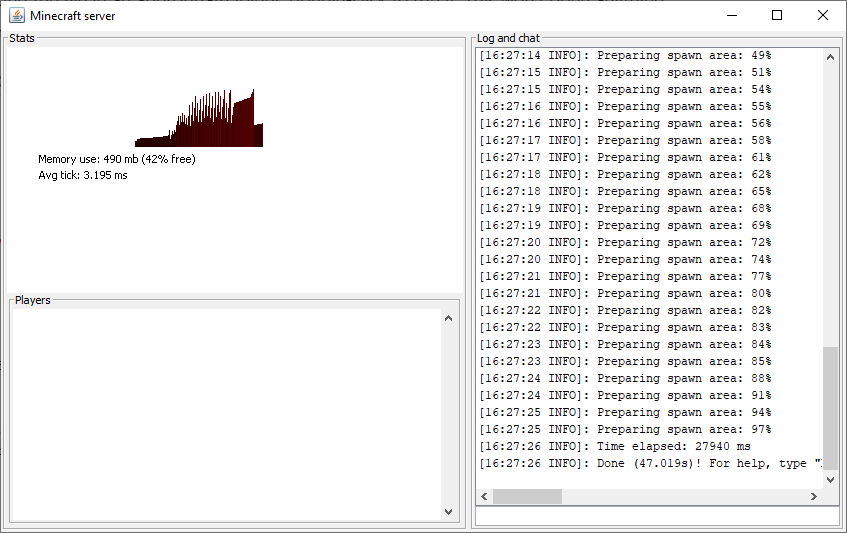
Then double click on on it server file once more to open the graphical consumer interface. This system will begin loading all of the conditions and you’re going to get a Completed backside proper (simply above the empty area), indicating that the server is prepared for internet hosting.
ubuntu
Open the terminal and use the cd command to navigate to the Minecraft folder. You too can open the particular folder, proper click on and choose Open in Terminal in order that it factors on to that folder.
Run now java -Xmx1024M -Xms1024M -jar server.jarand press enter.
The XMX And xms signifies the utmost and minimal ram that your Minecraft server is working with, respectively. You may experiment with these values to get an optimum expertise.
For instance, I can change it to:
java -Xmx4096M -Xms2048M -jar server.jar
which suggests the Minecraft server will work between 2 Gb and 4 Gb of RAM.
This prompts you to just accept the EULA earlier than working the server. Just like what we did in Home windows, discover the newly created eula.txt file and modify it by modifying it false Disagreeable WHERE.
After that, paste the identical command and run it:
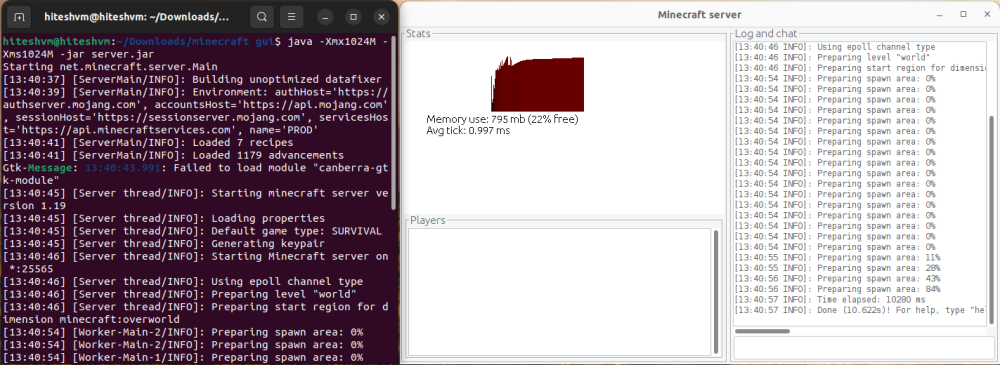
This may take a while, however quickly you will note a graphical consumer interface exhibiting the server standing.
You might also encounter some errors like loading module “canberra-gtk-module. This may be eliminated by putting in the particular recordsdata by opening and working a separate terminal sudo apt set up libcanberra-gtk-module libcanberra-gtk3-module.
Now restart the server and you’ll now not get this error.
Whereas having the GUI is nice, having to open the terminal each time to open it may be annoying. So we’ll create a script to run it simply.
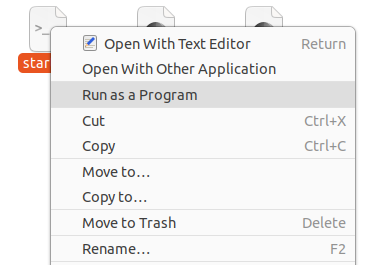
To do that, create a textual content file within the listing and title it as begin.sh. Then open this file with any textual content editor. Then copy and paste it java -Xmx1024M -Xms1024M -jar server.jarand save the modifications.
Lastly, proper click on on it and enter Traits on the finish of the popup, choose Rights prime and examine Enable working a file as a program.
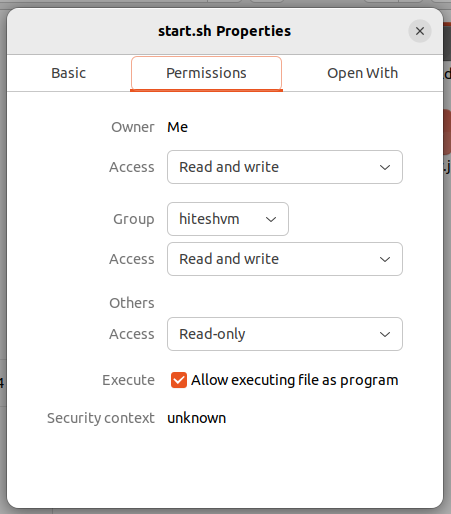
All you want to do now could be proper click on on the beginning.sh file and choose it Run as a program to open the Minecraft Server GUI.
So this was making a Minecraft server with a GUI. Let’s check out the choice.
Minecraft server with out GUI
That is undoubtedly a extra highly effective choice of the 2 and makes extra sense for the ability customers.
Home windows
On this technique, we don’t run the server.jar file immediately. We’ll make one as an alternative begin.bat file to run the server by way of the command immediate.
First, open the server.jar folder and create a begin.txt file. Now open the file in Notepad and replica and paste the next code into the textual content file and save the modifications:
java -Xmx1024M -Xms1024M -jar server.jar nogui
Then rename the file from begin.txt Disagreeable begin.bat.
Now double click on on this begin.bat file to begin the server for the primary time. This may create a number of recordsdata with the command immediate closing after executing the bat file.
If you wish to go additional, you want to modify the eula.txt file, much like what we did within the GUI technique.
When you do this and run the bat file once more, that is the output:
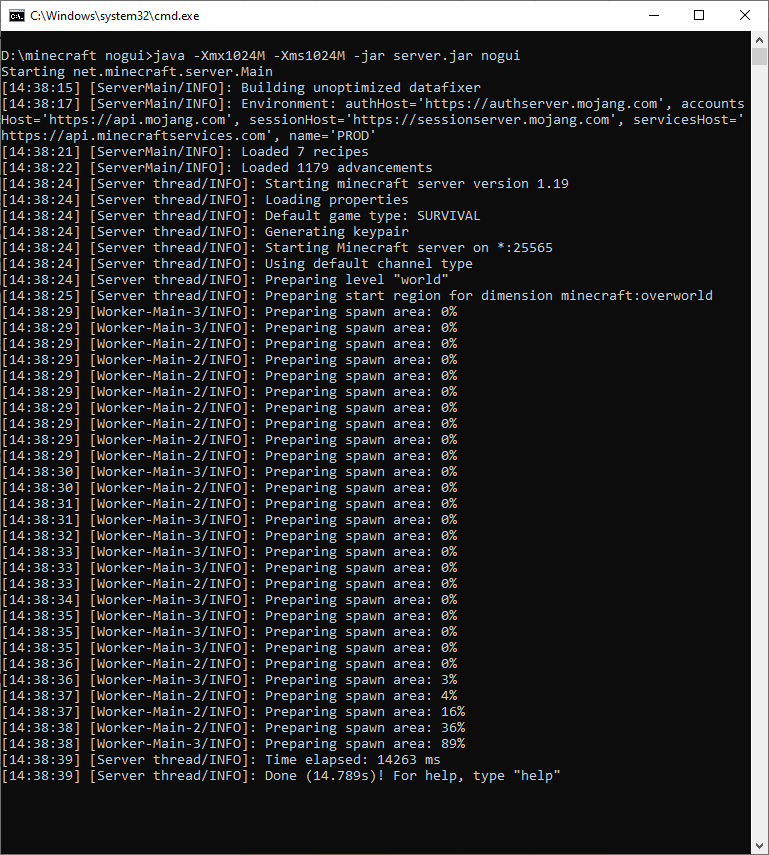
The ‘Prepared’ on the finish signifies that the server is working completely.
ubuntu
No GUI in Ubuntu means including one nogui within the script file we created earlier within the Ubuntu GUI technique. So the brand new script turns into:java -Xmx1024M -Xms1024M -jar server.jar nogui
Then save the modifications and run the script to open the Minecraft server within the terminal:

You may sort assist to get the listing of legitimate instructions, or you’ll be able to consult with the Minecraft WiKi.
Lastly, we’re carried out with the server creation half.
Now to play on this newly created server, all you want to do is obtain the Add server under multiplayer within the Minecraft launcher. Then sort localhost or 0 within the Server handle and click on Completed.
This may show the server within the multiplayer menu. Now choose the server and click on Come to the server On the backside.
This may open the sport for the native participant (you). However you did not make this to play alone, so let’s examine how one can play multiplayer by yourself server.
Host gamers in your Minecraft server
You may host others in your Minecraft server, inside or exterior your native space community (LAN).
Folks on the identical community you simply want the host’s inner IP handle, which you will get by typing ipconfig within the command immediate.

Ubuntu people can sort hostname -I to get the inner IP handle:
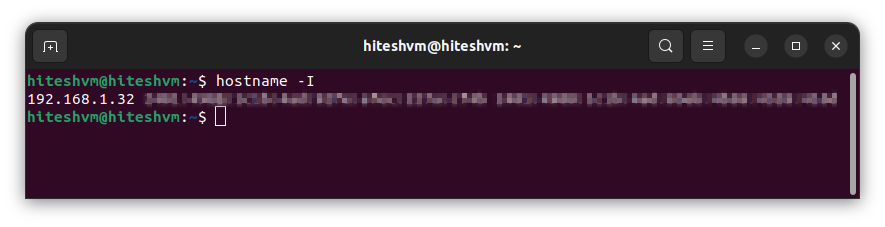
On this case, that is the start of the end result, 192.168.1.32.
Share this with different gamers, they usually can be a part of your server by mentioning it within the server handle part within the multiplayer tab.
Nevertheless, Minecraft internet hosting for folks exterior the LAN wants some networking abilities for:
- Firewall configuration
- Port forwarding
Step one is to configure the firewall to permit connections to a selected port quantity which yow will discover within the server properties file created in the principle server listing.
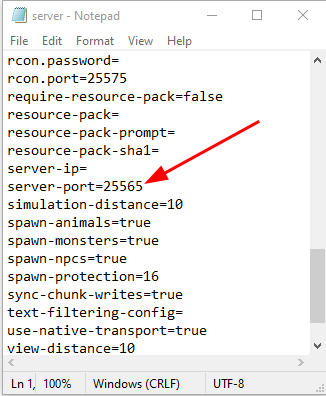
So the default port quantity is 25565.
Subsequent, you want to inform the firewall to permit connections by way of this port in order that your Minecraft associates can be a part of.
Firewall configuration
The firewall configuration is determined by your working system. Since this information is for Home windows and Ubuntu, we’ll undergo each.
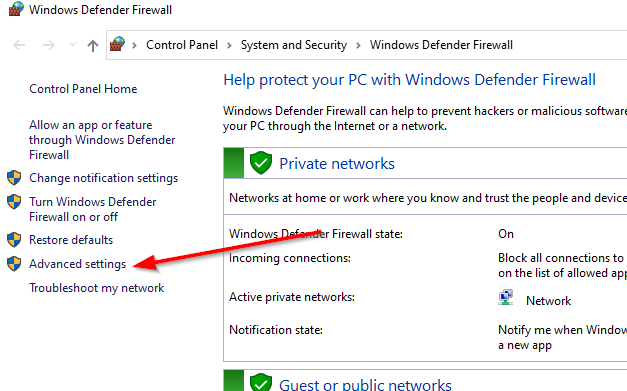
Configure firewall on Home windows
Press ⊞+R, sort firewall.cpland press enter.
Mainly, we’ll set inbound and outbound guidelines on the port (25565) for UDP and TCP community protocols. This shall be a 4 step course of. Watch this demo the place we full step one by creating an inbound rule for TCP:
You repeat this for inbound (UDP) and outbound (TCP and UDP) for a similar port.
Configure firewall on Ubuntu
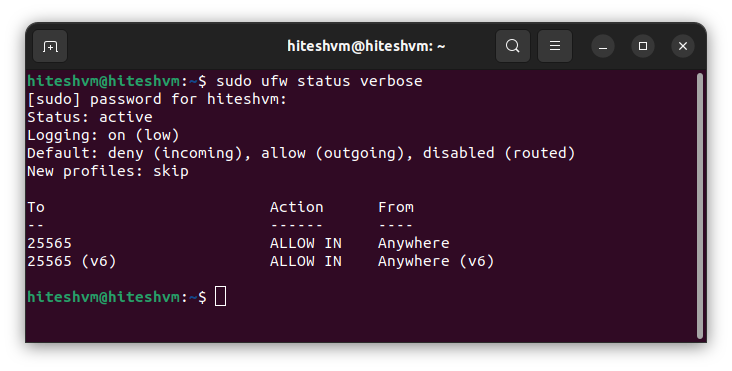
In Ubuntu, Firewall stays disabled by default and you may confirm this by working this system sudo ufw standing verbose within the terminal.
If it returns with Standing: inactiveyou’ll be able to activate it by sudo ufw allow.
Then sort sudo ufw permit 25565and press Enter to open port 25565, which is the default to permit connections in Minecraft.
Now we will examine the open port utilizing sudo ufw standing verbose once more:
Now that we’ve this port prepared for connections, it is time to make it accessible to others. This course of is named Port forwarding, which can take just a few seconds to a minute. However we will not clarify that right here, since that is primarily based in your Wi-Fi router.
Seek for your machine and carried out.
After that, your pals will want your public IP handle.
You will discover this by simply googling what's my ip handle or go to one thing like whatismyip handle.
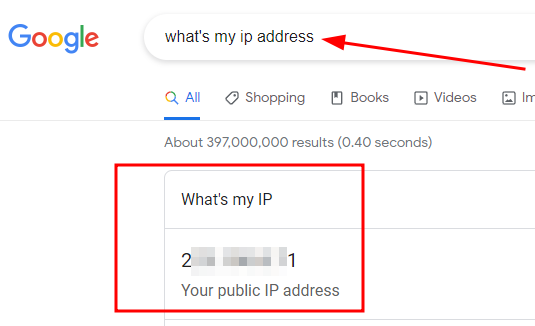
Blurring my public IP handle as soon as once more emphasizes that you just should not share yours with anybody you do not belief.
The method of becoming a member of this server is much like logging into your personal server, the one distinction being that they are going to use this public IP handle:port quantity (for instance, 125.245.74.894:25565) within the Server Handle part. And don’t fret concerning the server title, it is going to be retrieved mechanically.
Conclusion
In order that’s the way you create a Minecraft Java version server and let your pals be a part of it.
It is easy if the entire social gathering is on the identical LAN. This manner you merely create a server and share your inner IP handle.
For gamers on completely different networks, this consists of downloading and working the Minecraft server file, configuring the firewall, port forwarding, and sharing your exterior IP handle.
Whereas it’s doable to show your desktop PC right into a small server, you want a robust server to host and play on it on the similar time.
And for those who do not need to do that in your PC and do not just like the managed Minecraft servers, then we’ve an ideal information on methods to host Minecraft on Vultr.