

One in all WebSphere Administrator’s duties is to maintain the setting updated and you need to be conversant in the method. This assumes that WebSphere 7 is already put in and working on a Linux setting.
You possibly can observe the interactive (GUI) or silent mode to replace the Repair Pack and iFix (interim fixes) in WebSphere Software Server 7. The next describes how you can silently use a command line in one other phrase.
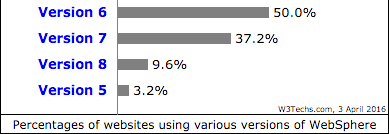
WebSphere 7 remains to be utilized by over 37% (as of April 2016) and thought it will be good to share the directions with all of you.
To begin with, it’s essential ensure you have the most recent replace installer WASH 7. If not, you’ll be able to obtain them from the next hyperlink.
http://www-01.ibm.com/help/docview.wss?rs=180&uid=swg24020446
- Obtain the replace installer for the platform you want from the hyperlink above. This may occasionally take a number of minutes relying in your web velocity.
- As soon as downloaded, extract them to the momentary location (/tmp) on a server.
Comment: Backup is the lifesaver so remember to take it earlier than doing something.
- Delete all contents of /Path/to/Websphere_v7/UpdateInstaller/*
- Create a response file “UPDIREsonsefile.txt” with following underneath /tmp
-OPT silentInstallLicenseAcceptance="true"
-OPT allowNonRootSilentInstall="true"
-OPT installLocation="/Path/to/WebSphere_v7/UpdateInstaller"
- Navigate to a folder the place you extracted the replace installer. On this ex:
/tmp/UpdateInstaller
- Run the set up command, specifying the placement of the reply file as an argument
./set up -options /tmp/UPDIResonsefile.txt –silent
It will take a couple of minutes and improve “Replace Installer to the most recent model”.
Apply repair pack replace
Obtain the mandatory repair pack from the next hyperlink to /tmp
http://www-01.ibm.com/help/docview.wss?uid=swg27004980#ver70
The next instance is predicated on the set up of IBM HTTP Server 37 Repair Pack.
- Create a brand new silent file”IHSFIXPACK Resonation File.txt “ with observe underneath /tmp
-W upkeep.bundle="/tmp/7.0.0-WS-IHS-AixPPC32-FP0000037.pak"
-OPT rootUserHasRunSlibcleanCommandSuccessfully="true"
-W product.location="/path/to/WebSphere_v7/HTTPServer"
-W replace.kind="set up"
- Navigate to the UpdateInstaller folder and run the replace.sh command with the placement of response information as an argument
/Path/to/WebSphere_v7/UpdateInstaller/replace.sh –choices /tmp/IHSFIXPACKResonsefile.txt -silent
Apply interim repair replace
The process is much like making use of a repair pack. You should use the identical response file that you simply use to put in repair packs. Nevertheless, you should exchange the placement of the repair pack repository with the placement of the momentary repair repository.
For instance:
/Path/to/WebSphere_v7/UpdateInstaller/replace.sh –choices /tmp/InterimFIXPACKResonsefile.txt –silent
The above ought to offer you an concept of how you can apply the Repair Pack within the IBM WebSphere Software Server 7 setting. By the way in which, do you know that WebSphere 9 is on the market on IBM Cloud? Strive it out, it is cool!